Setting up a smart trainer for the first time can feel daunting. There are cables, apps, sensors, and compatibility questions to work through before you even turn a pedal. However, once everything is in place, the experience is genuinely transformative. A smart trainer turns your existing road or mountain bike into a fully interactive training machine that responds to your effort in real time.
This guide walks you through every step of the process. From choosing the right trainer to arranging your space, you will have everything you need to get started with confidence.
What Is a Smart Trainer and How Does It Work
A smart trainer is a stationary device that holds your rear wheel, or replaces it entirely, and connects to apps and devices via Bluetooth or ANT+. Unlike a basic turbo trainer, a smart trainer communicates with software. It adjusts resistance automatically based on the terrain in a virtual ride, the demands of a structured workout, or the commands of a coach.
There are two main types. Wheel-on trainers clamp around your rear wheel and use a roller to create resistance. They are more affordable and easier to set up. Direct drive trainers replace your rear wheel entirely. Your chain runs directly onto a cassette mounted on the trainer. They are more accurate, quieter, and more stable, but they cost more and require a compatible cassette.
For beginners, either option works well. Your budget and how seriously you plan to train will guide your decision.
Choosing the Right Smart Trainer for Your Bike
Not every trainer works with every bike. Before purchasing, check compatibility carefully. Most smart trainers support standard quick-release axles, but modern bikes often use thru-axles. If your bike has a thru-axle, confirm that the trainer either supports it natively or comes with an adapter.
Cassette compatibility is another consideration for direct drive trainers. These trainers arrive without a cassette, so you need to purchase one separately and match it to your drivetrain. If your bike runs an 11-speed Shimano groupset, you need an 11-speed Shimano-compatible cassette. The same logic applies to SRAM and Campagnolo drivetrains.
Additionally, check the trainer’s maximum power output. Entry-level smart trainers handle up to around 1,000 to 1,500 watts of resistance, which is more than sufficient for most beginners and intermediate riders. More advanced trainers go higher, but you will not need that capacity early on.
Essential Indoor Cycling Equipment You Need Before Your First Ride
The trainer itself is only the beginning. A complete setup requires several supporting pieces of indoor cycling equipment to make your sessions comfortable, effective, and enjoyable.
A front wheel riser block is a small but important addition. On a direct drive trainer, your rear axle sits higher than your front wheel, creating an unnatural riding position. A riser block levels your bike and reduces strain on your neck, back, and wrists over longer sessions.
A sweat guard or frame protector is worth using from day one. Sweat is corrosive and will damage your frame, stem, and headset over time. A simple silicone or neoprene sweat guard fits over your top tube and handlebars and protects the metal from dripping moisture.
A large, powerful fan is essential for temperature management. Without outdoor airflow, your body heat builds up rapidly during a hard effort. Position a floor fan directly in front of you, aimed at your chest and face, to replicate the cooling effect of riding outdoors.
A training mat goes under the entire setup. It protects your floor from sweat and vibration, reduces the noise the trainer produces, and keeps the unit from sliding during intense efforts. Thick rubber or foam mats designed for gym equipment work best.
Finally, a heart rate monitor or power meter adds valuable data to your sessions. Many smart trainers include power measurement built in, but pairing an additional chest strap or armband gives you real-time feedback on your cardiovascular effort alongside your power output.
Setting Up Your Smart Trainer Step by Step
Once you have your equipment ready, setup is straightforward. Follow these steps in order and you will be riding within the hour.
Start by assembling the trainer according to the manufacturer’s instructions. Most units arrive partially assembled and require only minor adjustments to the feet and the axle mount. Place the trainer on your mat in your chosen training space.
If you are using a wheel-on trainer, secure your bike by clamping the rear axle into the trainer. Adjust the roller pressure against the tyre until there is firm contact with no slipping. Too little pressure causes wheel spin. Too much causes excessive tyre wear and heat.
For direct drive trainers, remove your rear wheel and mount the bike directly onto the trainer’s axle. Thread the chain onto the cassette as you would on a standard rear wheel. Check that the derailleur aligns correctly with the cassette sprockets.
Once the bike is mounted, plug in the trainer. Most smart trainers require a mains power connection, even if they communicate wirelessly. Connect the power cable and turn the unit on. A small indicator light usually confirms the trainer is active and ready to pair.
Open your training app on a phone, tablet, or computer and search for the trainer via Bluetooth or ANT+. The pairing process takes under a minute in most cases. Once connected, do a short spin to confirm that the app is reading your power output and controlling resistance as expected.
Choosing the Right Training App
A smart trainer without a good app is just a glorified fan. The app is where your training actually happens. Several excellent options exist for beginners.
Zwift is the most popular choice. It offers a virtual cycling world where you ride alongside other users from around the globe. The trainer adjusts resistance automatically as you climb hills or follow workouts. It is engaging, social, and motivating. A monthly subscription is required after a free trial period.
TrainerRoad focuses purely on structured training rather than virtual worlds. It builds fitness through scientifically designed workout plans and tracks your progress over time. It is ideal for riders with specific performance goals.
Wahoo SYSTM, previously known as The Sufferfest, sits between the two. It offers structured workouts with video content, mental training elements, and a strong community. It also integrates well with Wahoo hardware, though it works with most smart trainers.
Start with a free trial of one or two platforms before committing. Each has a different feel, and the one you enjoy most is the one you will actually use consistently.
Trainer Room Ideas to Build a Space You Want to Use
Your training environment matters more than most beginners realise. A well-organised, comfortable space makes it easier to show up consistently. These trainer room ideas can help you build a setup that supports your motivation.
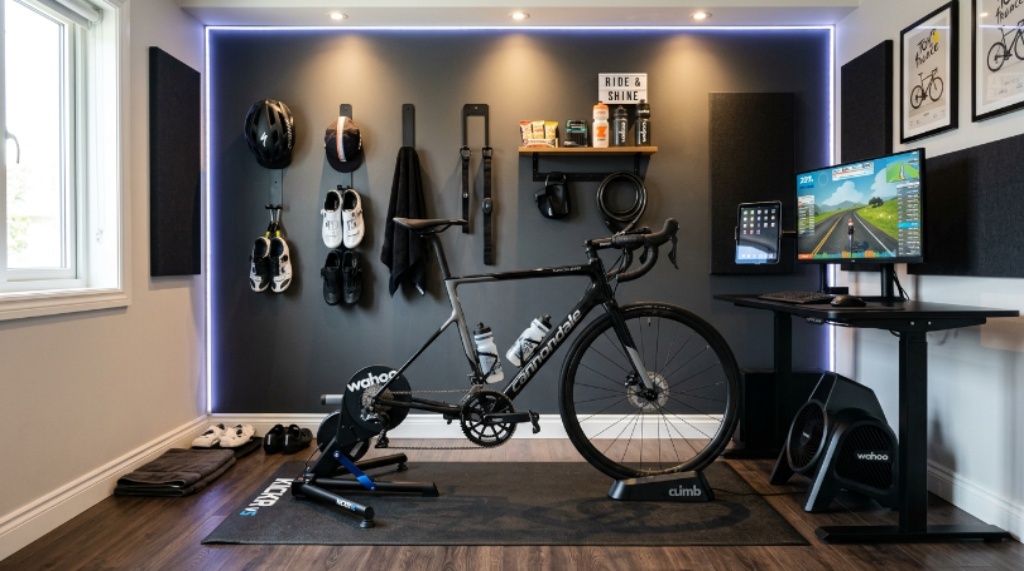
Dedicate a specific area to your training. This does not need to be a full room. A garage corner, a section of a spare bedroom, or even a covered balcony can work well. Having a permanent setup means you do not lose time assembling and dismantling equipment before each ride. The lower the barrier to starting, the more often you will train.
Use wall space for storage and inspiration. Mount a shelf or hooks for your helmet, gloves, shoes, and accessories. A small whiteboard for training goals or a favourite photo from an outdoor ride adds a personal touch and keeps you focused.
Lighting has a bigger impact than you might expect. Bright overhead lighting reduces eye strain during longer sessions, especially if you are watching a screen. Some cyclists use colour-changing LED strips to create an energising atmosphere that matches the intensity of their workout.
Cable management keeps the space tidy. Run your power cables and any device charging leads along the wall or use cable clips to keep them off the floor. A clean space feels more professional and is safer to move around in.
Sound is often overlooked as part of trainer room ideas. Good speakers or a quality pair of wireless earbuds transform the experience. The right music, podcast, or race coverage pushes you through hard intervals and makes solo riding far more enjoyable.
Calibrating Your Trainer for Accurate Data
Calibration ensures that the power numbers your trainer reports are accurate. Without calibration, your watts may read higher or lower than reality, making structured training less effective.
Most smart trainers require a spin-down calibration. This involves pedalling up to a set speed, then freewheeling while the trainer measures how long the resistance unit takes to stop spinning. The result corrects for temperature and tyre pressure variations.
Perform a spin-down calibration at the start of every session, after the trainer has been running for about ten minutes. A warm trainer produces more consistent results than a cold one. Your training app will usually prompt you to calibrate, or you can trigger it manually through the app’s device settings.
Additionally, keep tyre pressure consistent if you use a wheel-on trainer. Pressure affects how firmly the tyre contacts the roller, which directly influences power accuracy. Pump your tyre to the same pressure before each ride.
Conclusion
Setting up a smart trainer does not need to be complicated. Start by choosing a trainer that is compatible with your bike and suits your budget. Gather the essential indoor cycling equipment, including a riser block, sweat guard, fan, and mat, before your first session. Follow the step-by-step setup process and pair your trainer with a quality training app.
Think carefully about your training environment. Small improvements to your trainer room ideas, from lighting to storage to sound, create a space you genuinely want to spend time in. Calibrate your trainer regularly for accurate data, and explore different training apps to find the one that keeps you motivated.
With the right setup in place, indoor training becomes less of a compromise and more of a genuine advantage. You can ride harder, more consistently, and with more structure than most outdoor sessions allow. The first time you climb a virtual Alpe d’Huez or complete a perfectly designed interval workout, you will understand exactly why smart trainers have changed the way cyclists train.
Frequently Asked Questions
Do I need to buy a new cassette for a direct drive smart trainer?
Yes, in most cases. Direct drive trainers do not include a cassette. You need to purchase one that matches your bike’s drivetrain speed and brand compatibility. Check the trainer’s specifications to confirm which cassette standards it supports before buying.
Can I use any bike with a smart trainer?
Most road and mountain bikes are compatible with smart trainers, but you need to check your axle type. Bikes with quick-release axles fit most trainers directly. Bikes with thru-axles require a specific adapter, which many trainers include or sell separately.
How noisy is a smart trainer?
Noise levels vary by type and brand. Direct drive trainers are generally quieter than wheel-on trainers because there is no tyre-to-roller contact. However, all trainers produce some noise from the flywheel and resistance unit. A training mat reduces vibration transfer to the floor, which helps in apartments or shared homes.
Is Zwift the best app for beginners?
Zwift is one of the most beginner-friendly apps because it combines structured training with a social, gamified environment. However, the best app is the one you enjoy using regularly. Try free trials of Zwift, TrainerRoad, and Wahoo SYSTM before committing to a subscription.
How often should I calibrate my smart trainer?
Ideally, calibrate before every session after a ten-minute warm-up. At minimum, calibrate whenever you change your tyre pressure, move the trainer to a different room, or notice that your power numbers feel inconsistent with your perceived effort.